Pages

Tuesday, February 26, 2013

The Bindings

Routing the binding channels in a guitar body has to be one of the more stressful steps in building a guitar. You have a nice closed box and now you are going to start routing out pieces of it.. A mistake can be darn near unfixable if  you mess up big time.. Besides the channels need to be precisely sized and consistent for the bindings to look good once installed..

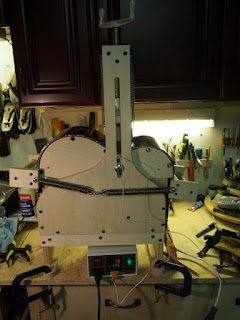
I've tried several methods to do this all with varying degrees of success.. I am partly limited by a small work space so some of the bigger parallel arm jigs for this are out of the question size wise.. My current jig is a variation on a Charles Fox design and ones I've seen in some production guitar factory videos.. The key to all binding jigs is that they reference off the sides of the guitar NOT the top which is arched, only a small part of the to top or back is in contact with the jig so the arch does not effect the accuracy of the routed channel..

This new jig worked very well and this was by far the least stress I have had routing binding channels so that coupled with the relatively small size of this jig makes it a keeper.. I'm sure some of the bigger jigs are even easier to use (from what I've seen) but they just are not an option for me due to space.
The jig, the side of the guitar references on
the guide that sticks out, depth is set by moving
the guide up and down and  by adjusting the
router bit's depth, the only place the top or back contacts
the jig is the small piece of wood with two screws in it.

Completed channels, nice smooth and even


Another view

Bindings installed and taped in place while the glue dries.
I use fish glue for this as it allows time to get the bindings set in correctly

And from the top

The completed bindings

From the back

and from the side, I'm happy with how the ebony looks with the Koa wood.

Saturday, February 23, 2013

Closing the Box

Now the sides, back and top come together to make a guitar body... Always exciting as you get to really see what the guitar will look like.


I also cut the slot and installed the Ebony end wedge..


Thursday, February 21, 2013

Bracing and Voicing the Top

THis will be the first time I have voiced a ladder braced top. I went about it the same way as I would for a X braced top. Tapping and reducing the braces until I got a "musical" tone I liked out of the top. With ladder braces this is a pretty easy process.

I did modify the braces slightly from the plans, I upper most brace is heavier and the lower most was rotated to a vertical orientation instead of the horizontal called for on the original plan.. I'm hoping this will give the top a longer life, some of those old guitars sounded good but were a bit under built..
using a go-bar deck & radius dish to clamp the braces

rough braces glued on


Finished voicing, braces at their final shape

Monday, February 18, 2013

Making a Rosette

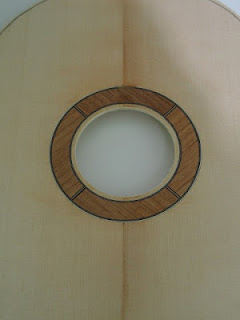
I find making the rosette one of the fun parts of instrument making, it allows you to be a bit creative and it is kind of a focal point of the instrument.. I had several ideas for this guitar but since it is a small instrument I thought most of them would be too busy for it so I ended up doing a relatively simple rosette made up for four pieces of Koa in alternating grain directions, separated by a small bit of black/white/black purfling and surrounded by thin black/white/black purfling..

The Koa is from back scraps. Unfortunately the radius for this rosette is so small my precision base circle cutter for the Dremel tool will not go that small so I had to use the circle cutter that came with the Dremel tool, not near as precise a jig, but it still worked.

All the pieces glued together ready to be cut into a rosette


Rosette routed out

Channel routed in the top


Held down with a acrylic sheet a go-bars

And its CROOKED &^%$#*#, 

Ok route out the crooked rosette, make a new rosette same process as above and glue it in...

Much better :-)

Completed rosette,
now straight and sound home cut
(back has also been thicknessed by the time I took this photo)


Friday, February 15, 2013

Back Braces

The back braces are now glued to the back, they are first pre-radiused in a radius dish. For this guitar I used a 15' radius.. The Braces are then glued in using a go-bard deck and radius dish to clamp them to the back.. This forces the back to a 15' radius.


Wednesday, February 13, 2013

Adding the Linings

I'm using purchased Mahogany reverse kerf linings, I just don't have the patience to make my own..

Some glue and bucket of 100 clamps and it's pretty straight forward... Of course once one side is done you need to flip it over and do the other :-)

Nice and colourful

Monday, February 11, 2013

Side Bending

So these are the first sides I've bend on a Fox Style bender all the others have been on a pipe. Things went pretty well except I got a some scorching of the inside face. Too hot a setting I guess, the good news is the sides bent very nicely with little spring back, I also bent the binding since I had the bender set up. I'm happy with  the bender I got from Blues Creek Guitars and the other parts from LMI, the controller and blanket.


Prepped to bend, a sandwich of wood and heating blanket between two steel slats

Bent and cooling off


The results, glued to the blocks and out of the form for a photo.

Jointing the Top

So here is my procedure for jointing the top, the back is done the same..

Clean up the edges on a shooting board using a jack plane, in this case a nice low angle jack from Lee Valley. - great plane.


I can get the joint perfect using the hand plane but I often times take more time than I would like chasing the joint around. So I finish the edge with a few passes of a 24" level with 220 PSA Sand paper. I find it works better for me this way.


Then the joint is glued together using original Titebond and held fast using a simple wedge jig, again simple and works great.


Thursday, February 7, 2013

Thicknessing and Jointing

Tonight I thicknessed the sides and jointed the back. Rough thickness is obtained using a Safety Planer and the final thickness is obtained using a home made drum sander.. Sides are about 2mm and the back right now is about 3mm which is a bit think bit I might try leaving it there, not sure. My idea is that the thicker = stiffer back might give a bit more projection from the small instrument.. Not sure if I will leave it at that thickness or not...

The Safety Planer, used by many Luthiers

I very simple jig to hold the far side of the wood down as it goes through
Back Jointed using a simple Jig

I'm also getting ready to route the dovetail mortise in the heel block, I'm doing this early on in the process as opposed when the box is closed, I'm thinking I prefer this but this will be the test.

Anyway here is the jig I made set up to route the dovetail using a template from LMI.


Monday, February 4, 2013

On to the Next One

Most people who build guitars will tell you it is a bit of an obsession. I guess I am no different in that regard, I've been bitten by the bug..

Building something that is both beautiful and beautiful sounding is very satisfying.

So the next guitar is a small tenor based on a Regal tenor guitar from the 1920's with a 21" scale length, 12 fret to the body and floating bridge and tailpiece.. I calling it a Celtic Tenor as I plane to try to optimize it for GDAE tuning as a sort of octave mandolin.. It should work well for Celtic style playing.

The Shape will be that of the Regal but I plan on changing a few things most notably the materials

Back and sides will be Koa, with and Englemann Spruce top, the neck will be Cedro (Spanish Cedar), with and Ebony fretboard, most of the trim will be Ebony..

The Raw Material
I'll be doing a few things different in the build process as well since I think I have a few methods in mind that work better for me.. First off I'll be using the universal mold I made, I don't have the space to keep making separate molds for each guitar type I make.. It also has what I hope are a few other advantages this I'll talk about as they come up.

Template used to set up mold


Template removed


On to the Next One

Most people who build musical instruments will tell you it is a bit of an addiction . Guess I am no exception, it is a very special feeling to build something that not only looks good but sounds good!

So off we go with the next guitar, his one is a small tenor based on the 1920's Regal Tenor Guitar

Sunday, February 3, 2013

OM Plus Guitar Finished

Well, I don't keep track of the number of hours spent on a guitar but this one was started in September..

It is all strung up and making music, it has good sound and lots of sustain so I'm happy with the result..