Pages

Tuesday, October 30, 2012

Working on the Neck

I've been working on the neck, the truss rod is installed, the back of the peg head is veneered with Bloodwood and the Ebony headplate is glued on.. I also routed out the peghead shape. To do this i used the method shown by Robert O'Brien using a sharpened piece of tool steel and a drill press. Slower than using a router but safer and more controlled. It's the second time I've done this and it seems to do a nice job especially across the end grain which can be an issue with a router.

Truss rod installed, the cavity needs to be routed before the headplate is glued on

Once the headplate and back veneer are glued on the peghead can be cut to shape using a template and an interesting technique. You have to do this in many shallow passes but it is very safe and there is little risk of tear out.

Shaped Peghead

Closer look

Bloodwood back veneer

Heel block and all

Inlay

My first attempt at doing some inlay work other than simple fret markers. Turned out OK, the actual cutting the shell and routing the cavities was easier than I expected. All in all a positive experience and I will be doing more and probably more complex as well.

Inlay scored and outlined with chalk

Cavities routed

Dry fitting

Glued in

Completed and sanded

Monday, October 29, 2012

More Jig Building

Since I plan to make several styles of guitars etc and probably with several experimental versions of each that add up to a lot of forms to hold sides in shape.. I just don't have space for that so I built a universal form that can adapt to most any guitar size.. This one should work for size 5 (Trez) to Dred plus Bouzoukis and Dulcimers..

I'm going to try using the larger diameter dowels as spreaders, not sure how that will work but if it does not spreaders are simple to make.

I may also mount a pipe flange and short length of pipe in the center that way I can use a radius dish with a hole drilled in the center to radius the sides.

The hardest part was cutting all the channels..

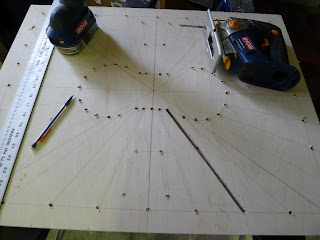
All laid out and starting to cut the slots

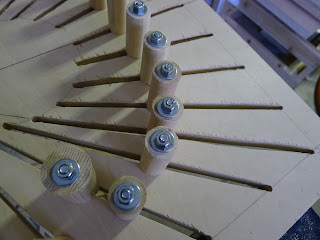
I think the larger diameter dowels will work as spreaders

The finished product

Friday, October 26, 2012

More Work on the Neck

Now that the scarf joint is done the peg head can be thicknessed in preparation for the head plate and the back veneer. Head plate will be ebony with an inlay to match the  sound port and the back veneer will be more Bloodwood.


Wednesday, October 24, 2012

The Scarf Joint

One advantage of not being on a production schedule is I can do the steps in guitar making in the order I feel like not necessarily one order that makes the most sense.. I've taken a break from working on the body to work a bit on the neck.. Tonight I cut the scarf joint planed it flat and glued it back on the neck blank..

I used a technique I saw on some other Luthier's blog (sorry can't remember which of the many I look at) to stop the joint from sliding around until the glue gets tacky and clamps tight.. Worked well.... I think the pictures below are pretty self explanatory. The tape is binding tape so lots of stick..


Sunday, October 21, 2012

Closed the Box on the OM Plus

So the top and back are now both on the sides and I have a guitar body. I still need to route the binding channels and attach the binding but I might leave that a week and do some work on the neck. Binding are a stressful thing to do so it is good to be in the right mood before attempting them.

All closed up and labelled 


Friday, October 19, 2012

Bracing the Top

Back to Guitar building.
I've finished the top bracing. it is a bit on the heavy side but then the top is Western Red Cedar which is a "looser" or "floppier" wood than Spruce so it needs to be thicker and/or have stiffer bracing.. The top taps well and sounds musical so the bracing should be good..

Rough shaped braces attached and ready for shaping/voicing

The Finished Product


Wednesday, October 17, 2012

Jig Making

Making your own jigs and tools is part of luthiery but it can be a bit of a pain when you would rather be working on an instrument.. Anyway I was in need of a better method of routing bindings and as that time is fast approaching with this guitar I thought I would take a break before voicing the top and make a new binding router jig.

I have very! limited shop space so one of the more commonly seen parallel arm jigs or some of the other larger styles just do not work for me. So I have made one based on the KMG guitar jig. I would have bought one from them but they only sell it as a complete kit with the laminate trimmer and I already have way too many routers and laminae trimmers so I built the part of the jig I need to fit into my existing router table. We shall soon see hoe it works..

My design :-)

Trimmer base set up to go in my router table

Business end of the jig

All together

Close up


Saturday, October 13, 2012

Cutting the Sound Port

Sound ports interest me both from an aesthetic and a practical point. I'm interested to see how this one effects the sound of the guitar as I have never played or as far as I know heard a guitar with a  sound port.

When it came to cutting it the basic principle is simple - reinforce the area, make a design, print it out and glue it to the side then route with a dremel tool and spiral cutter..  In practice it is a bit more intense since it is one of those one wrong move and there is no going back kind of activities..

Anyway this one turned out good (IMHO)..


Thursday, October 11, 2012

Sound Hole & Rough Shape Done

Well the top is now cut to the rough shape and the sound hole is cut out and bound with WB purfling.. Looks good IMHO..

Getting close to closing the box..


Wednesday, October 10, 2012

OM Plus Progess

Well the side stiffeners have on in so the sides and end blocks are done and ready for the top and back.


I've also thicknessed the top, came out to 3.0-3.1mm which I think is good for Western Red Cedar, sounds right so that must be the right thickness..


So far so good, top braces are also rough cut so I'll be gluing those up next..

Sunday, October 7, 2012

Carrying on with the OM Plus build, the sides are bent and the end blocks glued up and the kerfed lining installed.. The back is braced and voiced.. I'm playing around with the back bracing both decorative and stiffer.. Going for the concept of the back being a reflector..


End Blocks Glued in Place

Yes Baltic Birch for the Tail Block with some veneer for looks.
I believe it is stronger especially if you add a pickup later on

Linings clamped, you can never have too may clamps

Starting to take shape

Back Braces, Cherry and Cocobolo Sandwich