I find making the rosette one of the fun parts of instrument making, it allows you to be a bit creative and it is kind of a focal point of the instrument.. I had several ideas for this guitar but since it is a small instrument I thought most of them would be too busy for it so I ended up doing a relatively simple rosette made up for four pieces of Koa in alternating grain directions, separated by a small bit of black/white/black purfling and surrounded by thin black/white/black purfling..
The Koa is from back scraps. Unfortunately the radius for this rosette is so small my precision base circle cutter for the Dremel tool will not go that small so I had to use the circle cutter that came with the Dremel tool, not near as precise a jig, but it still worked.
.JPG) |
| All the pieces glued together ready to be cut into a rosette |
.JPG) |
| Rosette routed out |
.JPG) |
| Channel routed in the top |
.JPG) |
| Held down with a acrylic sheet a go-bars |
.JPG) |
| And its CROOKED &^%$#*#, |
Ok route out the crooked rosette, make a new rosette same process as above and glue it in...
Much better :-)
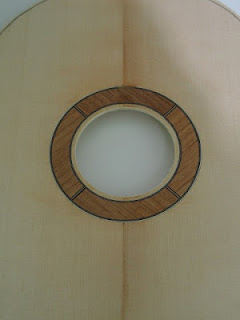.JPG) |
Completed rosette,
now straight and sound home cut
(back has also been thicknessed by the time I took this photo) |
.JPG)
.JPG)
.JPG)
.JPG)
.JPG)
.JPG)
.JPG)
.JPG)
.JPG)
.JPG)

.JPG)
.JPG)
.JPG)
.JPG)
.JPG)
.JPG)
.JPG)
.JPG)
.JPG)
.JPG)
.JPG)
.JPG)

.JPG)
.JPG)
.JPG)
.JPG)
